Posts filed under ‘Crafts’
1st Quarter Review of 55th Birthday Yearlong Plan: Create 55 Times

Sewed a piggy bank. I keep this cute feltie in my purse for any quarters that come my way. I am saving this money for spending money for India July/August 2013.
This year I am doing unexpected things all because I am 55. To read more about the 9 things go here for My 55th Birthday Yearlong Plan.
This post is about Number Six: Create 55 times. That means at least once a week I will engage in something creative. I just feel so much better (emotionally) when I set aside time for this.
I have created 12 times so far. Here’s the list which is also on my right side bar:
 Planted Spring boxes. My garden lacks sunshine. So I am pleased that there are a few shade loving plants I can grow on top of the patio fence. I have begonias, impatients, and a columbine. Although the columbine isn’t doing so well.
Played Scrabble in Spanish. This is a lot more work than playing in English at least for me since Spanish is not my native tongue. As you can see I am liberal with my definition of “create.”
 Created Salt Clay Crosses. This idea is from That Artist Woman. Several Sunday school classes enjoyed making these at Easter time. In fact, the 4th/5th grade class still has their crosses on the bulletin board in their classroom. Do you think they’d notice if I snuck them home?
I still have dough in my fridge. So I am ready for another time of making salt dough creations. I wonder what summer item I could create? Perhaps a sand dollar or star fish?
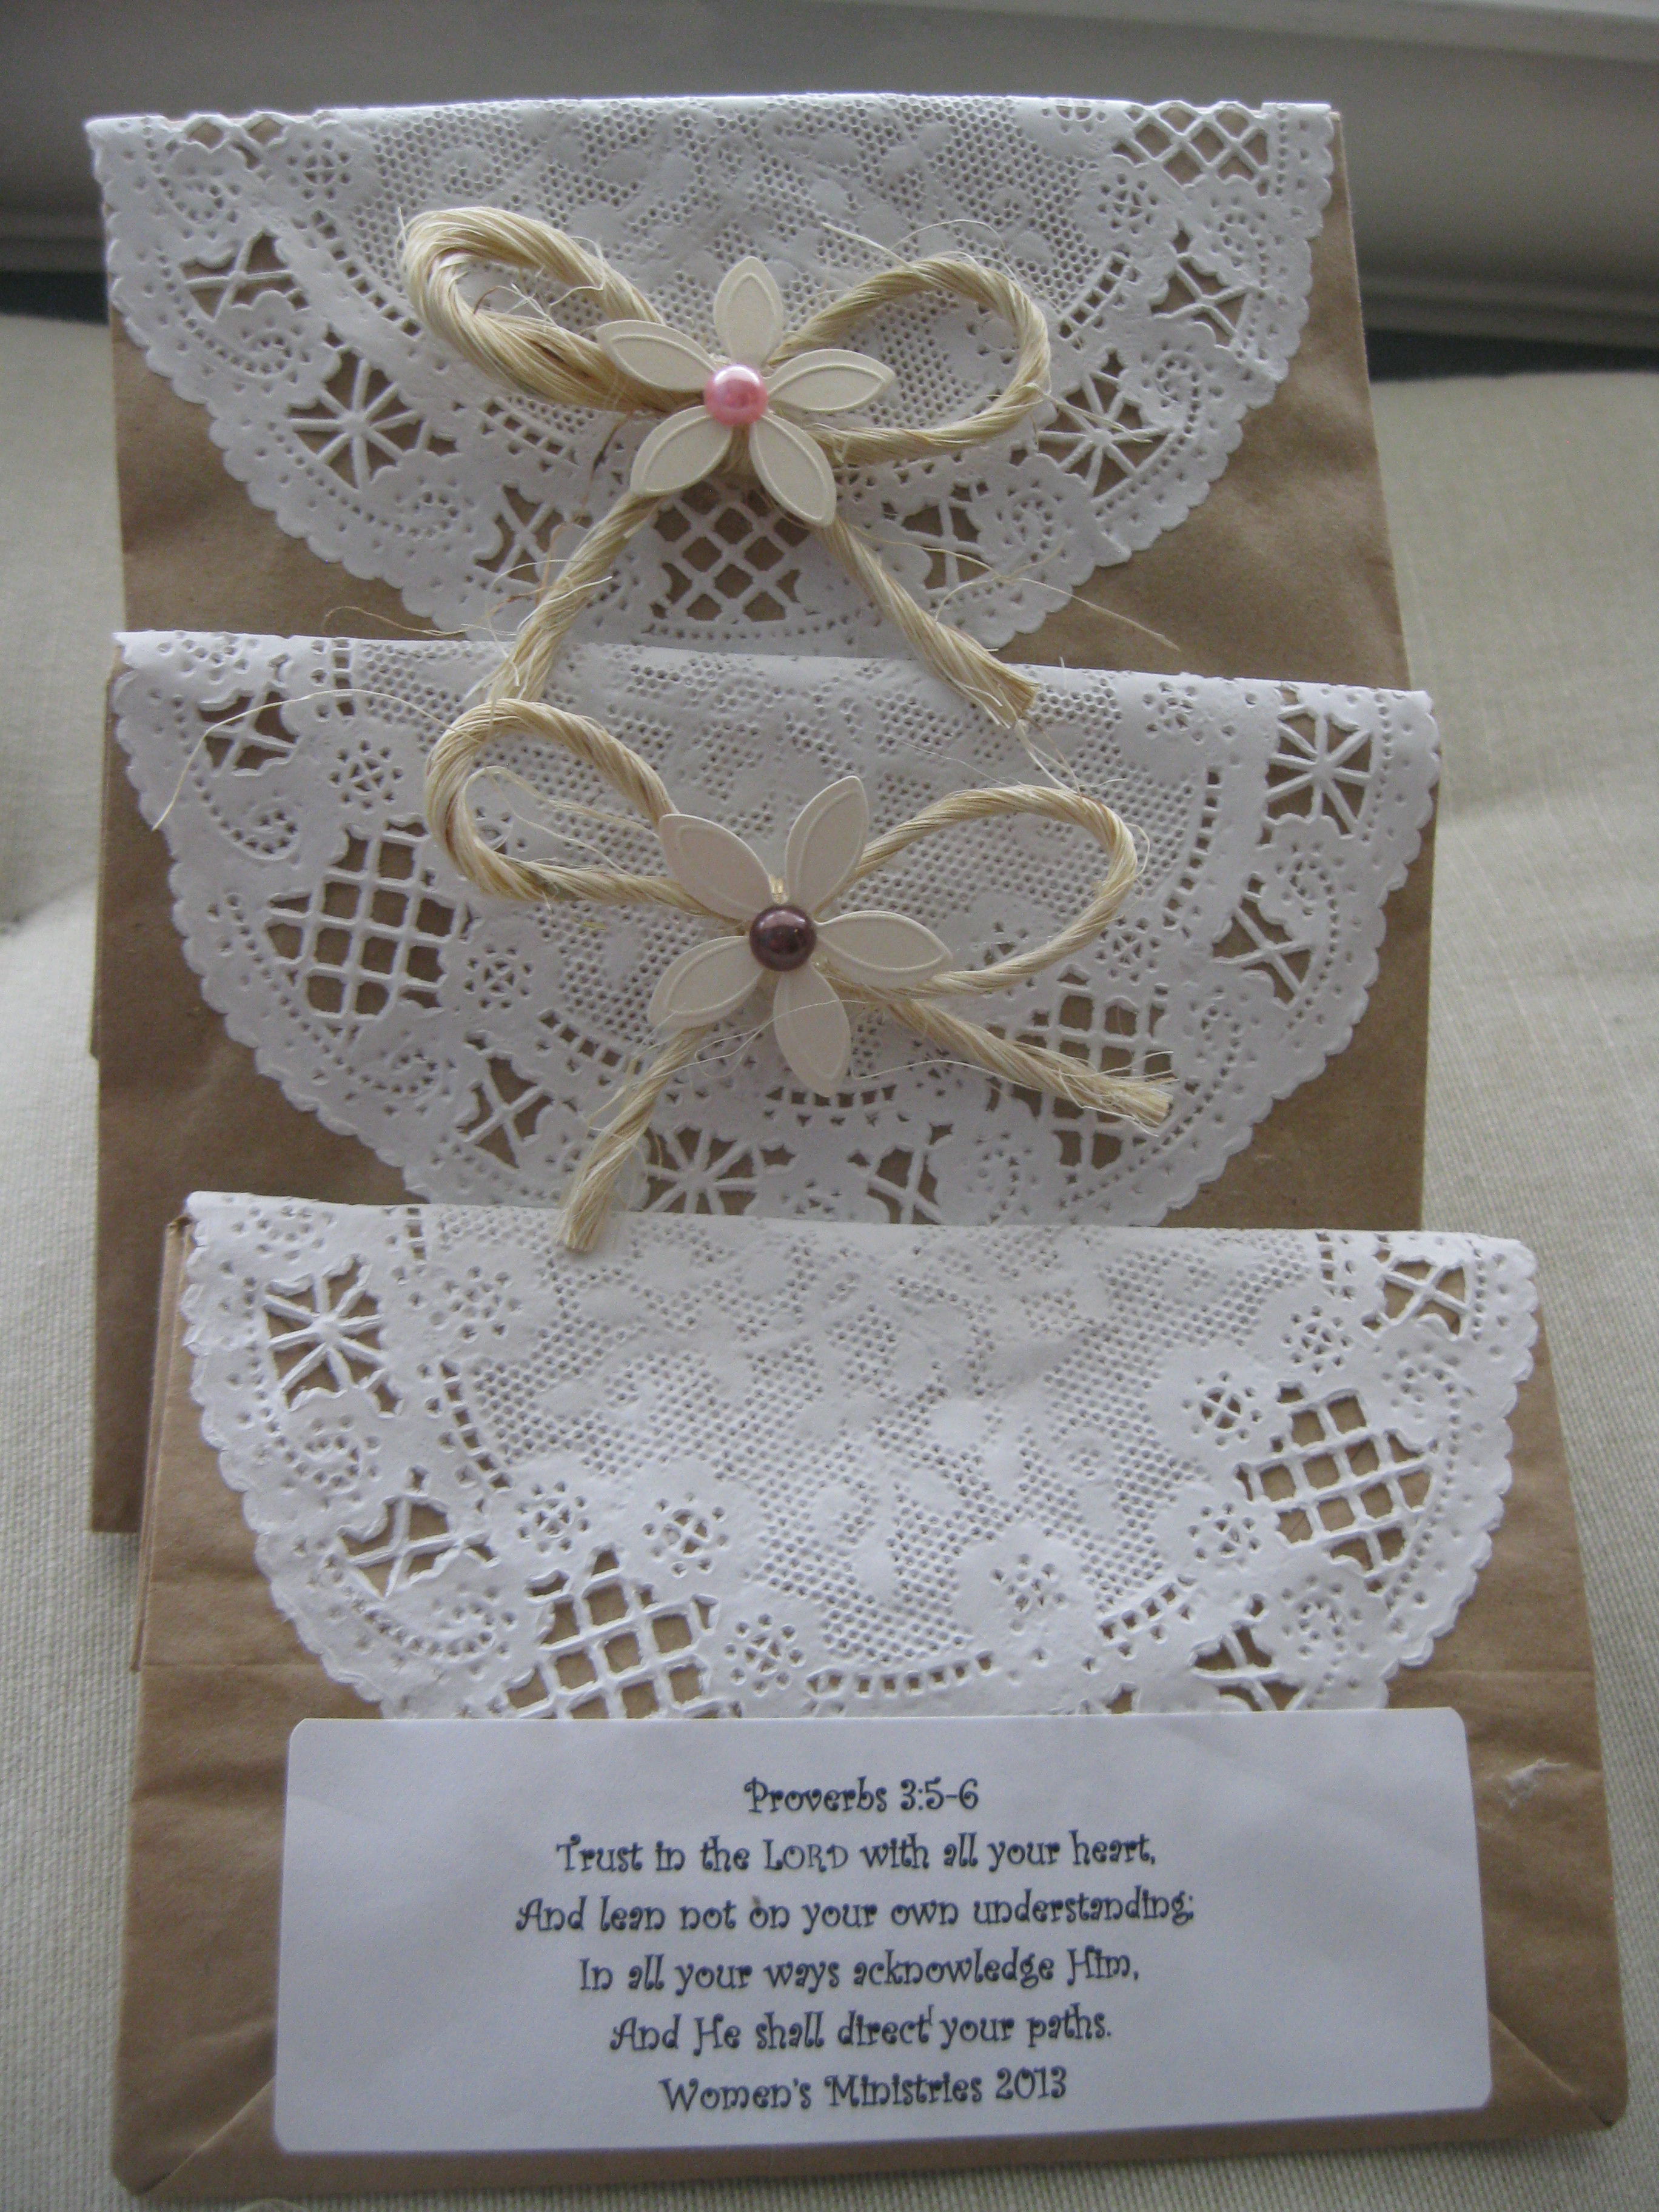
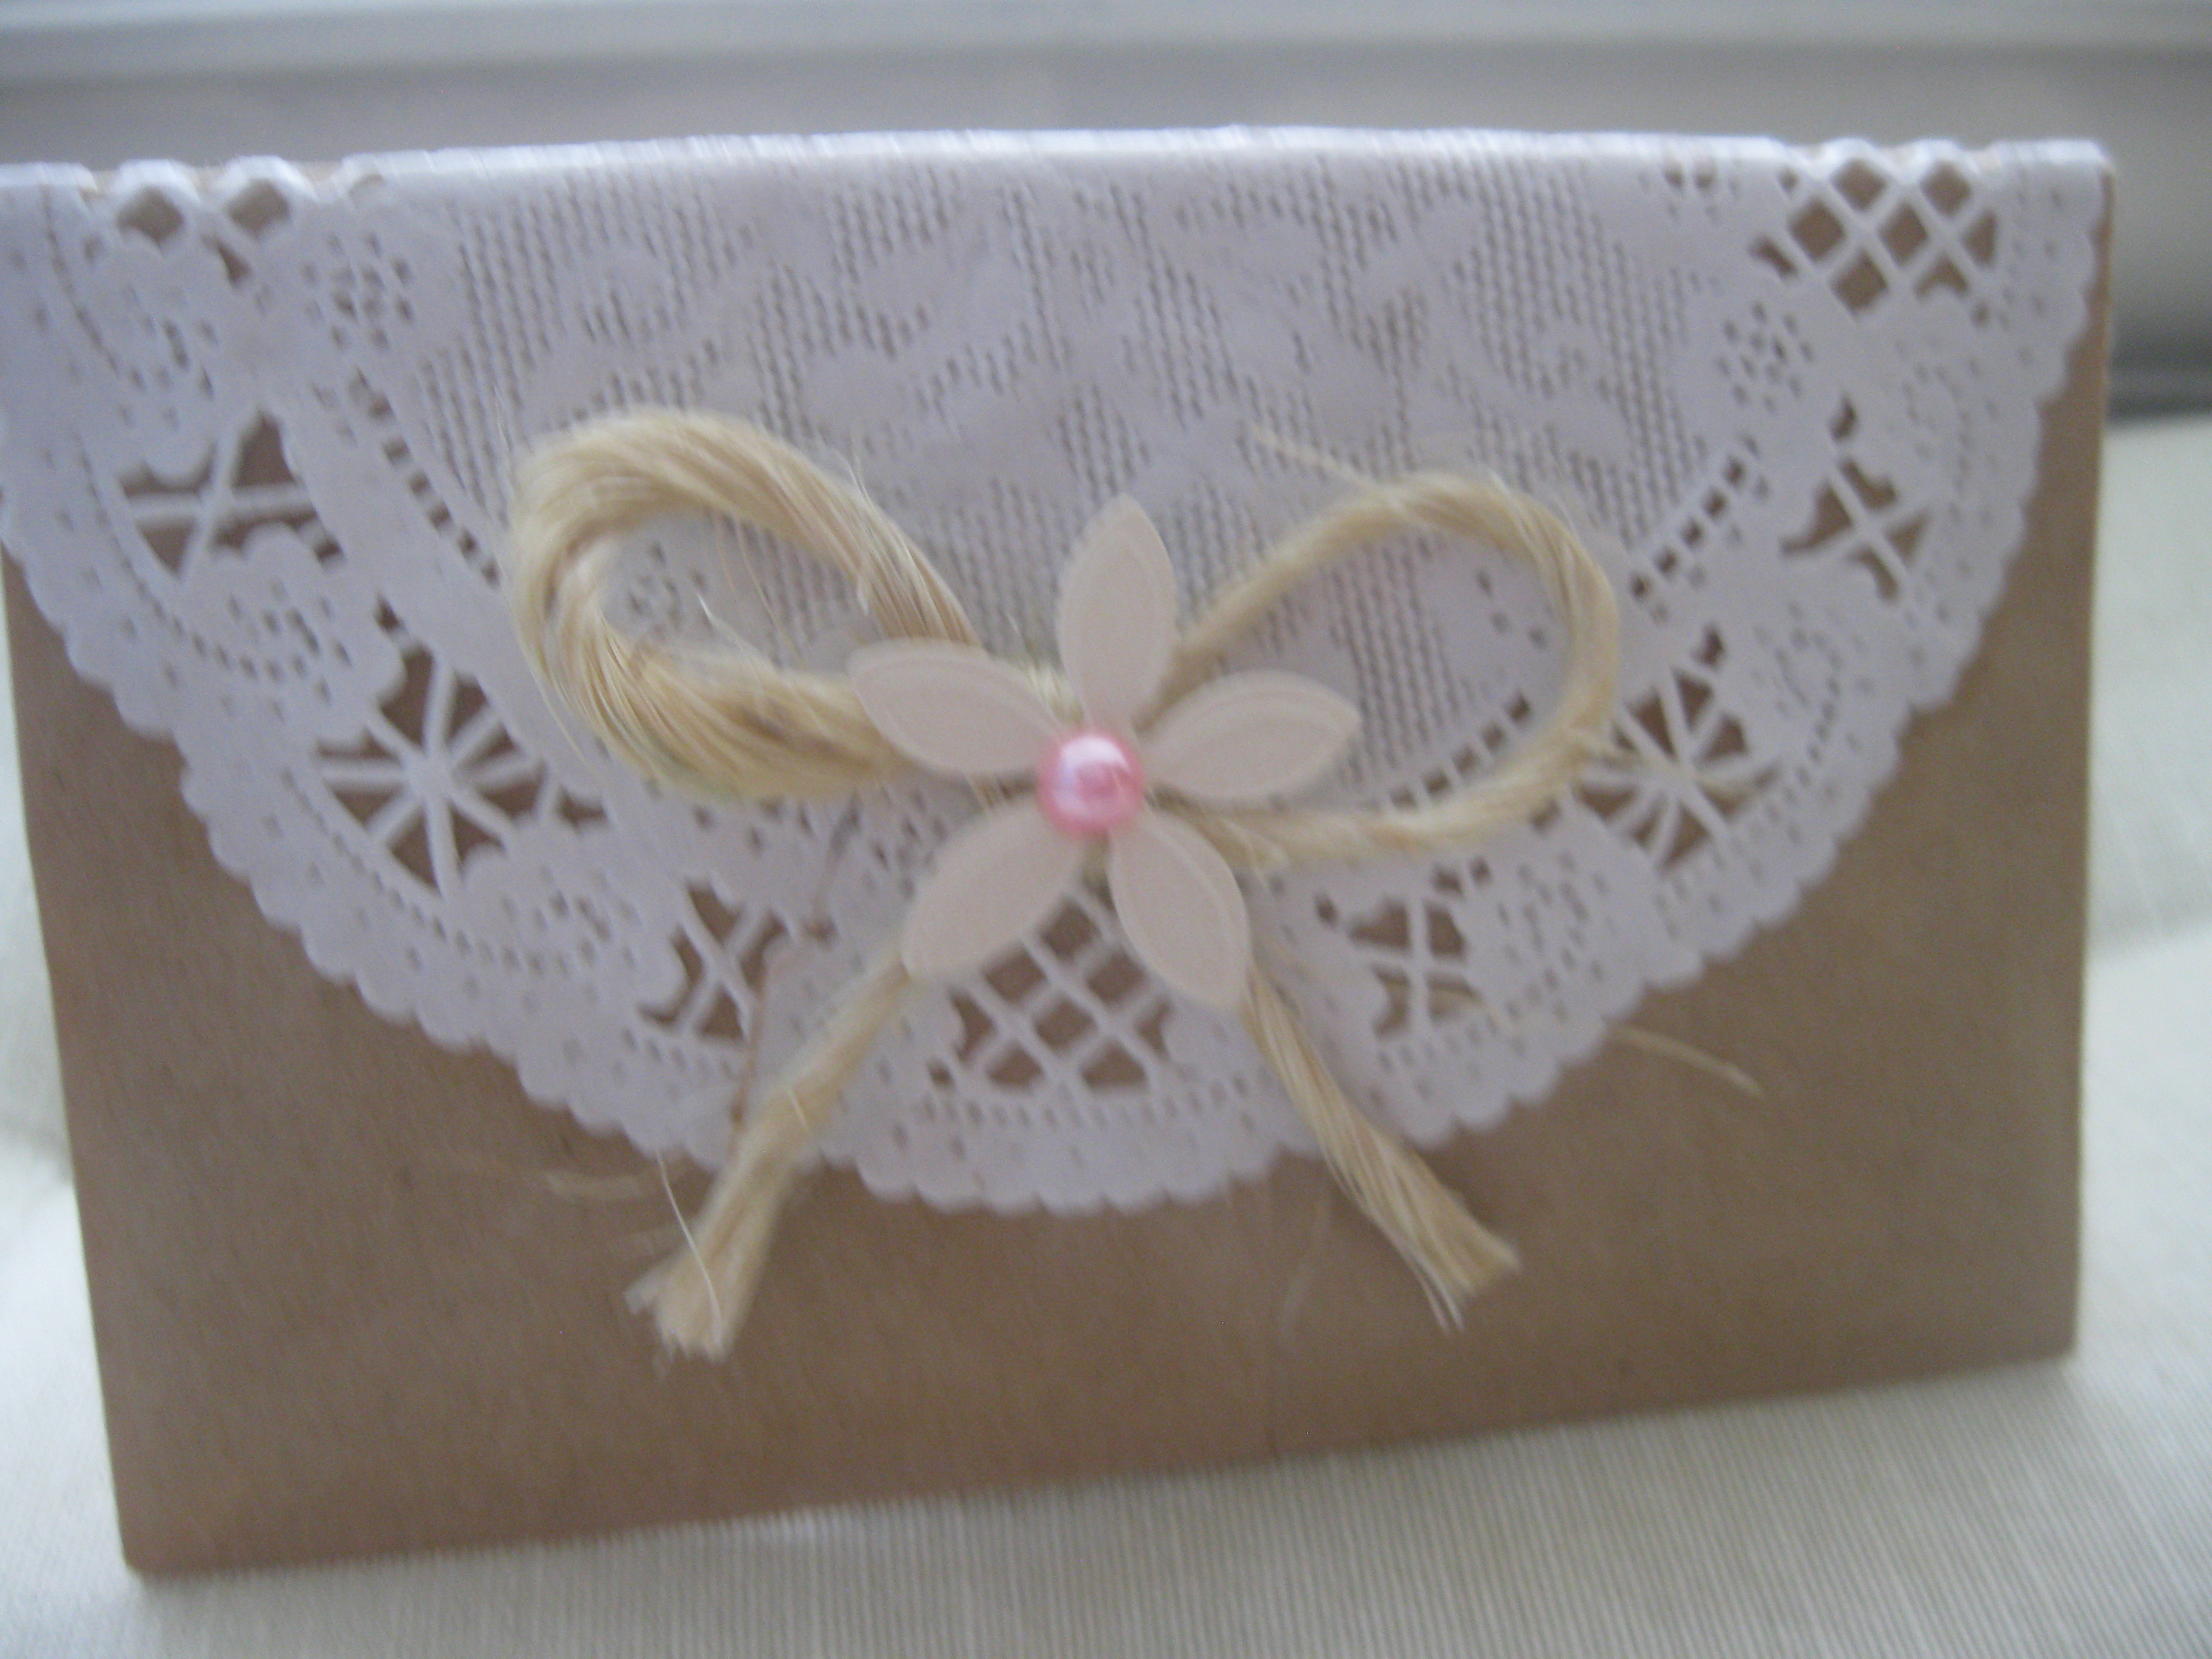 Mother’s Day Gift. The Women’s Ministry Team met 3 times in order to make these Mother’s Day gifts for the ladies in our church. Lorna was the designer of these. The bag is a brown lunch bag. The sachets are filled with dried lavender. The verse on the backside is Proverbs 3: 5-6.
Copied 2 cards at a card party.
Wrote a rough draft for a paper.

 Cut a hardback book into a Kindle cover. I gutted one of my hardback children’s books so that I could put my Kindle inside. It was a little finicky cutting the pages, but I LIKE how it turned out.
Boiled 2 cans of sweetened condensed milk to make dulce de leche. I ended up doing this twice. 2 cans for me and 2 cans to share.
Hemmed 2 pairs of pants. Hey, it involved a thread & needle.
That’s it for this quarter. It is fun to have all these completed things on one page. See you the end of September.
Your Turn . . . What have you been crafting lately?
Related Post . . .
Friday’s Fave Five
 Friday’s Fave Five reminds me to look at the week and think about the joys it contained. Spending a few days in the East Bay was joyous.
- I wrote a (rough draft) paper for work.
- I read up for my talk for Retreat.
- I made a Kindle cover from an old hard back book.
- And I enjoyed going with 3 family members to see Rafi as a kid wolf in Jungle Book (play).
But wait, there’s more. I am extra wordy today because its been a long time since I’ve posted an FFF.
So below are 5 more highlights from the week.
- Getting to know my 3-month old grand-daughter. Today I got to hear her first giggles. Her mom sent me a 17 second video of this event. It is cuteness!!! AND I got to hold her some when I visited last weekend.
- Fixed headlight. The bulb has been burned out for weeks. When I visited my daughter last weekend, she changed it while I read the directions.
- I had one vhs video transferred to a dvd (at CVS). I wanted to try one first to see if it was worth it. It is! I watched home movies with my kiddos from when they were 6 and 7 years old. We had two hours of memories with my (deceased) mom, site-seeing in England and Wales, and hearing my kiddos with their cute British accents.
- I participated in the April Blogging From A to Z Challenge. I only missed 4 days. That is pretty good for me. But I do plan on finishing these posts. It was also cool to be able to “meet” new bloggers.
- I finalized my India mission letter today. And I created an Event on Facebook for an upcoming fundraiser: a yard sale, car wash and flea market on Saturday, May 18. We will be doing 3 (main) things in India. (1) Host a conference for 500 women. (2) Buy and pack shoeboxes to give to children. (3) Raise money for and buy 60 sewing machines. Go to the following link to read more about the trip: INDIA Trip is More Than Travel Delight; It Includes a Conference, Shoeboxes, & Sewing Machines.
Leave a comment about a fave from your week. Or better yet, write your own list and link up at Susanne’s Living to Tell the Story.
X: Using an X-ACTO to Make a Kindle Cover from a Hardback Book

This book is about Captain Kidd’s last 6 years of life. He claims He was a privateer under orders from England. But he was imprisoned, tried, & convicted as a pirate. Fair? Read & decide.
I am reading through the books on my bookshelves to see which books I can let go of. Go here to see why.
I’ve recently read some of my children’s books like . . .
- The Summer of the Swan
- Civil War on Sunday
- The Mystery Girl, and
- The Mysterious Voyage of Captain Kidd.
I’ve had this last book since my kiddos were young. The copyright is 1970. The sticker on this hardback book says the book cost $2.95. For more information about Captain Kidd, go to this link.
I liked the book but won’t read it again. But since I think the cover is cool I didn’t put the book in the “donate pile.” I decided to make it into a cover for my Kindle.
I followed the directions here (from Rimarama) to make mine.

I just checked out how much I could have sold this on e-bay. Yikes. I could have made between $27.08 and $50.00. Instead I cut into this vintage book!
This took me about 3 hours to make. The most time-consuming part is the cutting out the pages part especially the corners.
Tips and Observations
- Use a clamp to hold the pages together after you have modge-podged them. I put a piece of cardboard between the clamp and book so that a dent would not appear on the book.
- I drew around my Kindle to make my cutting lines. Make sure you draw straight down and not at an angle inwards. If you draw at any angle inwards, the “cave” will be too small. You will then have to recut the pages to make the cave bigger. This will add considerable time to the project.
- Use a sharp blade in your x-acto knife. If it isn’t sharp, the pages will tear.
-

As I cut out the pages from my book, I looked at all the picture pages including the table of contents as possible pages to line my Kindle “cave.”
When you change the blade to use the other side, put some finger nail polish on the used side. That way you don’t have to remember whether it is new or used.
- Use a metal ruler as a guide when you cut along your pencil line. This will keep you from cutting away more than you mean to. I did this for about the first 20 pages or so.
- I used a file to smooth some of the page corners. This really wasn’t necessary. After I did the final modge-podge step the pages looked good enough.
- I didn’t use scrapbook paper as top page as per the directions. Instead I chose to leave the cave frame as it was. And I put the Table of Contents in the cave and a cool picture page (from the book) on the inside of the left cover. I modge-podged them both in place.
-

I put a loose ribbon behind the Kindle. Now it is easier to lift it out of the cave.
I really wanted to use this particular book. Even though it didn’t have a 1 inch margin between the Kindle and the edge of the book page, I tried it. It seems like it will work anyway.
- My “cave is a little tight for the Kindle. So I put a loose ribbon behind the Kindle. That way it is easier for me to lift my it out of the book.

Related Posts
- How to make a Kindle case from an old book
- Q: QUICK! Decorate your KINDLE Cover With This No Sew Idea
- Kindle cover
-

Finished inside of book
K: 3 Reasons I Love the KINDLE Especially When my Shoulder Was Broken (plus 5 more reasons)

___________________
NOTE: This post is written for the Blogging From A to Z Challenge. There are 22 categories and my category is MI = Miscellaneous.
During the month of April I will post 26 times finishing up posts that have been in my draft fie for at least a year. For a list of all the posts go to the A-Z button on my header.
Today’s letter is X. The topic is Using an X-ACTO Knife to Make a Kindle Cover from a Book.
Friendship Quilt Questions

We want your name and a verse that is significant to you. You can write the reference only or include the words.
I’ve been getting questions about the Friendship Quilt that CNC’s Women’s Ministry is organizing. Below are the questions and answers. If you have more questions, don’t hesitate to ask.
- Is it too late to sign a block? NOOOO. You will have another opportunity on Sunday, April 21st.
- Where do I go to do this? The blank blocks will be in Rudat Hall (at CNC) Sunday morning. A member of the Women’s Ministry Team will be at a table with these blocks and the special pen.

It has been fun looking up the verses that each one chose. I’d love to know the story behind them. Wouldn’t you?
- What does it cost? Nothing.
- What will you do with the signed blocks? 4 ladies (Scotti, Michelle, Shirley, and Carol) will sew the top together and then quilt the whole thing. THEN we will have a raffle to see who goes home with this meaningful quilt.
-

What verse would you put on a block? Why? If you’ve already done this, why did you choose your verse?
When may I buy raffle tickets? As soon as the quilt is done, we will sell raffle tickets. Probably sometime in June.
- What will you do with the money? The proceeds will go towards Women’s Retreat 2013 expenses.
- Tell me again, what do I need to do?
- (1) Come to Rudat Hall this Sunday morning (April 21st) and locate the table with the quilt blocks.
- (2) Tell the women’s ministry volunteer that you’d like to sign a block.
- (3) Listen as she gives you instructions.
- (4) Sign your name.
- (5) Write down a verse that is significant to you.
Looking forward to seeing you at THE table.


Q: QUICK! Decorate your KINDLE Cover With This No Sew Idea

I applied the paper to my cover about 2 months ago. There is no noticeable wear and tear and I transport it a lot in my backpack.
In March 2011 I received a Kindle as a birthday present. (Thanks sista and family!) Of course I needed a cover. I didn’t want to pay a lot of money for something fancy so I chose this black one.
Recently, though, I’ve wanted something with a little more colour. I went on Google looking for home-made Kindle covers. Here is some of what I found. . .
- Transform a book into a cover. Here is another way to do this. And one last way to use a book as a cover.
- Grab some cardboard, contact paper, and velcro and you can create a standing cover.
- This is my favourite sewed Kindle cover.
But I didn’t want to sew, hack apart a book, or even worry about getting corners precise while using contact paper. Instead I grabbed scrapbook paper, modge-podge, a paint brush, scissors, and a pencil.
What follows is a no-sew, very easy way to glam up your cover.
Directions
- Cut the scrapbook paper to fit the front of your Kindle case.
- Swipe modge-podge on the top of the cover.
- Place the paper on top of the modge-podge.
- Brush more modge-podge on top of the paper. Put on a light, even coat.
- Let it dry overnight. You probably don’t have to wait that long before it is dry and you can apply more modge-podge. This is just what I did.
- Apply modge-podge 2 more times according to steps 4 and 5.
- You are now done. Enjoy showing off your Kindle cover.
Your Turn . . .
- Have you made a Kindle cover? Or decorated one? If yes, share photos.
- Do you know how long you should let modge-podge dry between coats? If yes, share that information in the comments.
Related Posts . . . 3 Reasons I Love the KINDLE Especially When my Shoulder Was Broken (plus 5 more reasons) . . . . Using an X-ACTO to Make a Kindle Cover from a Hardback Book
______________________________________________________
NOTE: This post is written for the Blogging From A to Z Challenge. There are 22 categories and my category is MI = Miscellaneous.
During the month of April I will post 26 times finishing up posts that have been in my draft fie for at least a year. For a list of all the posts go to the A-Z button on my header.
Today’s letter is Q. The topic is how to decorate a Kindle cover QUICKLY.
C: Easy to Make CLAY Crosses Using Homemade Dough

These crosses were made by kiddos in the Kindergarten/1st Grade Class.
Homemade clay is easy to make, inexpensive, and can be used in a variety of crafts and art projects. And there are many recipes available, even gluten-free ones. Since my daughter wasn’t participating and no one else is gluten intolerant, I used wheat flour.
I recently made up a salt, four dough for the kiddos in our Sunday program at church. I used 2 cups flour, ½ cup salt, and 1 cup water. I ran out of white flour so I used up some old wheat pastry flour (that I was afraid to use for baking). It made the crosses look like they were made out of stone. I think it was because of the flecks of wheat in the flour.

These are crosses made by Gavin (5th Grader).
Previously when making this salt dough clay, I’ve used food dye to colour it. Gail Bartel (from That Artist Woman) suggests using acrylic paints. So I tried that. I like using the acrylics better than food dye.
- There is a wider range of colours.
- And the paint didn’t stain my hands, counter, or clothes. Yes, I can get that messy!
The clay was successfully used by the preschool to 5th graders to make crosses.

I love how each cross is so distinctly different. These 4 crosses are made by Eliana (4th grade).
The bead and clay cross instructions and examples from Gail are found here.
We will make these again next year.
- We might make some of them into magnets.
- And I will test to see if these would hold up as a rear view mirror decoration.
Your Turn . . . Share a project you’ve made using homemade clay dough.
Related Posts . . .
- 4 Types of Home-Made Ornaments Using Decoupage, Dough, Clay, & Fabric
- Grateful for Creativity and Life
NOTE: This post is written for the Blogging From A to Z Challenge. There are 22 categories and my category is MI = Miscellaneous.
During the month of April I will post 26 times finishing up posts that have been in my draft fie for at least a year. For a list of all the posts go to the A-Z button on my header.
Today’s letter is C. The topic is the Homemade CLAY Dough.
Glittered Ornaments
Making these glittered ball ornaments was easy, inexpensive, and fun. Plus they look very elegant. Danielle, Shari and I made about 80 ornaments.
These are a few samples of the ones we made for the Children’s Ministry volunteers in 2012. I think they look especially festive on my silver tree.
I was going to write a tutorial but found this one. So go here for the instructions.


What do you have with 2 skewers, a paper mache apple, white and green felt, and an 11″ white tree?

I even made a white tree pin for Frosty. I want to make it into a Frosty Snowman tree too. But not tonight.
You have some of the “ingredients” to make your very own Frosty the Snowman Christmas Tree. Or is it snow woman?
You’ve probably seen photos of such trees on the web. Like the one here. How do you like my miniature version at a fraction of the cost and labour? If’/when I do a tutorial for this cutie, I will hotlink it here.
Working on this creation has been a favourite activity. It has brought me joy and a time to stop the brain from going into over-drive. That makes me grateful.
Read on for four other things that are on my Friday’s Fave list. . . .
TWO. Women’s Christmas Party Devotional Inspiration. Thanks to Barbara (from Stray Thoughts) I found our theme this year, a Christmas Version of I Corinthians 13. Our game and sharing time revolved around making sure this Christmas season was about loving those around us. It isn’t about having the best decorated home, tastiest treats, prettiest and most packages, and engaging in charitable works. If these are done without love, the actions are useless.
THREE. Supporting a Friend’s New Job. Ken Cooley, a member of my church and husband of a co-worker won a seat as a CA assembly member. Ken was sworn into office on Monday. A bunch of us attended that and it was a privilege. Ken is a man of integrity and godly wisdom. I am excited to see how his term(s) in office will make a practical difference for CA,
FOUR. Filming Going Well. This year we are filming the Children’s Christmas play. It will be shown on December 16th at both services. After each of the 3 film vignettes, there will be live singing lead by the children (Emmanuel and Joy to the World) and one solo (Mary, Did You Know?) Phil (videographer & creative genius) and Pam (wardrobe, director, etc) have been awesome to work with. Their ideas, their direction for the kiddos, and their perseverance has been encouraging. I pray that the final product leads all in attendance to reflect anew upon the miracle and purpose of Jesus’s birth.
FIVE. Prayer time at Bible Study. I know I’ve said this before, but it is a favorite again this week. One of the first things we do at our study is to have one person share a bit about what’s going on in their life. Then we gather round and pray. This “activity” helps us to get to know one another better – to see the real person with the mask taken off. And it is an emotional support for the one being prayed over. Read Prayer Impacts us in 5 Ways. In the comments Brenda (from Brenda’s Blog) has added 4 more ways prayer helps us.
BONUS: Christmas Lights on Homes. While taking kiddos home after a filming shoot, we came across a street with 4 homes all AGLOW with lights everywhere in their yards and on their homes. Truly magical looking. I remembered this while reading Brenda’s FFF.
 Your Turn . . . Please share a blessing, a gratitude, a favourite time from your past week either in the comments or on your blog. To read what others have to say, go to Susanne’s place at Living to Tell the Story.
Related Posts
- Almost 3 Dozen Christmas Snowman Crafts
- Frosty the Snowman Video (length – 25:26)
- Play Felt Tree and Felt Frosty the Snowman (taped to the a wall)
- Video on How to Make a 3 Foot Frosty the Snowman Christmas Tree
From Eyeglasses to Snowman Ornament (tutorial)

I found this idea on Pinterest. Unfortunately the link did not go back to the original designer. This is my version of the original.
For our family’s 2nd annual ornament-making fest, I scoured the internet for many months before coming across the cutie I will be showing you. We make other ornaments besides snowmen, but the star of the program is always a snowman. This is the link I have for our star snowman.
Supplies Needed
- Eyeglasses
- Ammonia based cleaner and rag
- Paint brushes
- Acrylic paint: white, black, orange
- Blush (makeup), brown, tan, or pinkish eye shadow
- Acrylic spray
- Strip of fabric for the scarf
Step One – Clean
Clean eyeglasses with cleaner. Rinse well with water. Dry with non-lint towel.
Step Two – Base coat
Paint lenses of eyeglasses in a thin coat of white paint in one direction. Try to keep paint off the rim of the glasses. Let it dry thoroughly. You can use a hair dryer to help it dry more quickly. If you put on more paint when it is still wet, some paint will come off. That is why you need to let it dry between coats.
Step Three – Base coat in opposite direction
Paint lenses in the opposite direction with a thin coat of white paint. Let it dry thoroughly. You can use a hair dryer to help it dry more quickly.
Step Three – Finish base coat
Do this 2 or 3 more times, or until you have a totally white surface. If you paint in thin layers and alternate directions, each time you will end up with a smooth surface. However, it will still look good, if the surface isn’t smooth; after all, real snowmen aren’t smooth.
Step Four – Eyes
Eyes: Practice making ovals on a scrap piece of paper. In the top lens about a finger width down paint two ovals in black. Paint two lines for eyebrows above the eyes in black paint.
Step Five – Nose
Nose: In the middle of the lenses, make an orange triangle. Start with the fat end of the carrot ending with the pointy end.
Step Six – Mouth
Mouth: Dip the end of your paint brush into black paint. Use this end to make dots for the mouth.
Step Seven – Let top dry & work on bottom
Let the top lens dry while you work on the bottom lens.
Step Eight – Buttons
Buttons: Using black paint make three circles on the bottom lens. Or you can use the end of a fat paint brush or pen dipped in black paint to make the circle buttons.
Step Nine – Finish eyes & nose
Top Lens
- Eyes: Dip your paint brush end into white paint. Use this end to put dots onto your eyes to give them dimension.
- Nose: Using a liner brush dipped in black paint, outline the carrot in black. Also paint a few vertical lines.
Step Ten – Finish buttons
Bottom Lens – Buttons: Paint a small white curved line on the buttons.
Step Eleven – Cheeks & outline
Blush:
- When both lenses are dry do the following: Put blush on a small, dry paint brush. Make circles on the cheeks.
- Outline the snowman with same blush or desired colour of eye makeup.
Step Twelve – Date and initials
On the inside of the lenses, paint your initials and current year.
Step Thirteen – Clean & seal
Wipe off frames well. Clean off smudges and any white paint.
In a well-ventilated area, spray the acrylic spray the outside and inside of lenses. Use thin layers.
Step Fourteen – Scarf
Tie the strip of the fabric on the “neck” of the snowman.
Step Fifteen – Display
Put the snowman onto your tree and admire.
Step Sixteen – Picture & post
Take a picture and send it to me so I can make a post with everyone’s creation. Or write your own post and link it to this one.
_______________________________________________________
During November I am writing or posting a photo about something for which I am grateful. This explains why.
My gratitude posting for November 28: I am finally making time for crafting. Besides being fun, crafting gives me something pleasant to think about, gives me more creative thoughts in all areas, and is a stress release. And when I craft with others, it is a bonding experience.
_____________________________________________________
Your Turn . . .
- Did you make this snowman?
- Did you make any ornaments, snowman or otherwise, this year?
- Do you give ornaments as presents?
- What are you grateful for today?
Related Posts . . .
Snowman Ornaments Made of Foam & Some Made with Eyeglasses

The designers for the snowman foam kit, couldn’t have envisioned their product looking this cute.
It was the beginning of the greatest Christmas ever. Little food. No presents. But there was a snowman in their basement,” (Markus Zusak, The Book Thief).
Like many people I am enamored with snowmen. You can read books, find merchandise, and peruse Pinterest on this topic
Snowmen can even be part of family traditions.

Top left ornament is from a wooden kit.
For many years, I have bought my nieces and daughter a snowman ornament.
And now on the day after Thanksgiving we congregate to make ornaments. This year I bought 2 kits. One was a foam snowman kit and the other kit had wooden ornaments: owl, penguin, sock monkey and snowman.
This year we decorated with puffy paint (of course), markers, and craft paint. I even had glow-in-the-dark paint in green and orange.

Aren’t these sock monkies darling?
Of course we put our names and the current year on the backs. You think you are always going to remember the year when you did something memorable. But you don’t.
I think it would be neat to glue a current photo onto the back of one of the yearly made ornaments. I hope to remember to do this next year. i also hope I remember to print the photo onto archival paper so that the photo will last throughout the years and become a true heirloom.

All from the same kit Surfing Snowman
There was one ornament that was the star. The foam and the wooden ornaments were the warm up acts. I looked all year long for THE ornament we would make.
I found the eyeglass snowman ornament on a Pinterest board. Unfortunately the link did

The fuzzy bit in the middle is a scarf.
not go back to the original designer of this project. It was easy enough to duplicate for all ages from 11 to 54. If/when I write a tutorial for this ornament I will include the link here.
Everyone was proud of their ornaments. We made another day of great memories. Maybe because we had snowmen in our basement too. (My daughter’s living space is a renovated apartment in the basement of a house.)
Go here for the eye glass tutorial.
_______________________________________________
During November I am writing or posting a photo about something for which I am grateful. This explains why.
My gratitude posting for November 27: Making memories and then recalling them from year-to-year help connect me with family and friends. They remind me what’s good and precious in life.
____________________________________________________
Your Turn . . .
- Are you enamored with snowmen or any other decorator object?
- Do you buy yearly ornaments for anyone? If yes, who?
- What kinds of traditions do you have at Christmas time?
- What are you grateful for today?
Related Posts . . .
4 Types of Home-Made Ornaments Using Decoupage, Dough, Clay, & Fabric
 This year our church is decorating the church tree with home-made ornaments. We want ornaments from the kiddos as well as from the adults. Coming up with ornament prototypes for the Sunday school PreK’s through 5th graders has been a blast.
Over Thanksgiving break I spent 3 days with my daughter, Elizabeth. 3 of my nieces also stayed with her. For a majority of that time we made ornaments. We covered Elizabeth’s tree with home-made ornaments and we each got to take some home.
Below are the types of ornaments the church kiddos, my nieces, my daughter, and I made. NOTE: The clay, decoupage, and dough ornaments were sealed with Krylon crystal clear spray finish.


- This stain glass look-alike and single-colour ball were made using smallish pieces of tissue paper dipped in liquid starch. The tissue covered the gold balls quite nicely.
- The Cinnamon Salt Dough Star (more info below) was made with tissue decoupage and puffy paint.

- 2 Cups Flour
- 1 Cup Cinnamon
- 1 Cup Salt
- 1 1/2 Cups Warm Water

 You can cover the cooked dough with glitter or puffy paint! See the tissue-decoupaged ornament peeking through just off-center?
 This star was painted with white paint to look like frosting. Then I covered the “frosting” with cake sprinkles.


 The Cinnamon Salt Dough does well with acrylic paint.
(1) Aren’t Patrick and Pooh cute?
(2) The bright blue shows up nicely on the tree. The red/white candy cane is explained down below.
(3) Ninjas look good on the tree too.
The Cinnamon Salt Dough does well with acrylic paint.
(1) Aren’t Patrick and Pooh cute?
(2) The bright blue shows up nicely on the tree. The red/white candy cane is explained down below.
(3) Ninjas look good on the tree too.


 (1) The foil-lined cookie sheet is full of our baked projects.
(2) My son made the snowman on the right. He wasn’t shy about being the only male.
(1) The foil-lined cookie sheet is full of our baked projects.
(2) My son made the snowman on the right. He wasn’t shy about being the only male.

 (1) Kate’s snowman is small, about 4 inches tall and reminds me of The Snowman.
(2) Em’s snowman is BIG about 7 inches tall. Love those blue eyes.
(3) Sammi made a snowman too. I am not showing her art because some are presents and at this moment I cannot remember which ones are. So best not to post any.
(1) Kate’s snowman is small, about 4 inches tall and reminds me of The Snowman.
(2) Em’s snowman is BIG about 7 inches tall. Love those blue eyes.
(3) Sammi made a snowman too. I am not showing her art because some are presents and at this moment I cannot remember which ones are. So best not to post any.


How to Make a Christmas Card Wreath for $2.00

Christmas cards are too meaningful and too pretty to NOT enjoy all season long.
How do you normally display your Christmas cards? I’ve taped them to the wall, stood them up on top of my entertainment center, feathered them in a big bowl, and lined them on twine.
An internet search showed how people are displaying their cards . . .
- on a vertical ribbon
- from garland
- hanging from a yardstick with clothespins
- turn them into a crocheted greeting bowl
- a branch tree holds them nicely
I recently saw this cork photo wreath and thought THIS is what I’ll do with my cards this year!
But I wanted to do so with a smaller budget. I visited The Dollar Tree to see what would be good substitutes for a roll of cork liner and a cardboard circle (both can be found at any craft store).
My $2 idea is one foam board (20″x30″) and one 16″ wreath (any kind would do since it’ll be covered).
Additional Supplies You’ll Need
- Adhesive to stick wreath to foam board (hot glue, tacky glue, wood glue)
- “Adhesive” to attach cards to wreath (tacks, hot glue, tacky glue, double-sided tape, or scrapbook adhesive pop dots)
- Pen and scissors
- 15-20 Christmas cards
Directions


- 4. Cut out the foam circle by cutting along the lines you’ve drawn.

- This is the wrong side of the wreath.
- 5. Attaching foam to the wreath. Glue the wreath to the foam circle using the adhesive of your choice. I used wood glue and put books on top until the glue was dry. I did this in the evening and it was dry the next morning.
- NOTE: Be sure to have glue dry in this upside-down position. Otherwise the glue will run through the vines of the wreath. Yes, I learned the hard way.


- 6. Gather Christmas cards you want to display. Lay out your 15-20 Christmas cards and arrange them in a pleasing pattern on top of the foam board. Attach the cards using tacks, sticky pop dots, double-sided tape, or hot glue.
- I used the sticky pop dots. On average I used 3 dots per card.
- NOTE: I used some of the pop dots to close the cards. I did not want them swinging open every time I opened/shut the door.

7. Hang up your wreath. My wreath is in my bedroom hanging from an over-the-door hanger.
Related Posts . . .

